з”ЁPythonеҲӣе»әжјӮдә®зҡ„жһ¶жһ„еӣҫ( дәҢ )
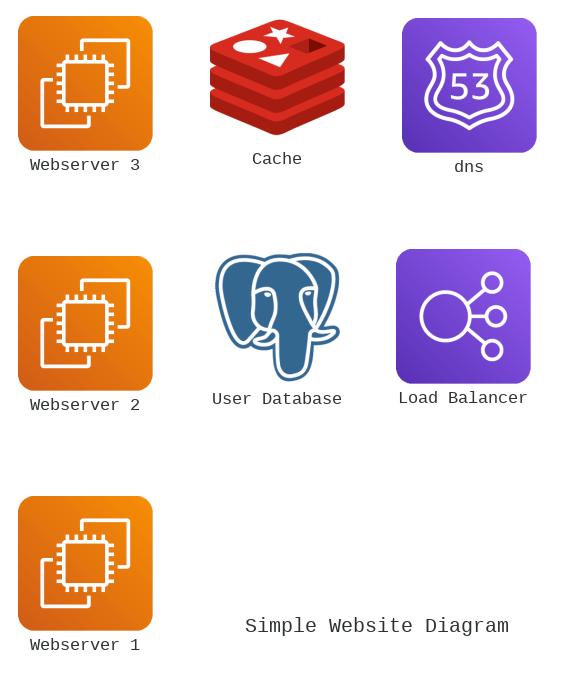
еҰӮжӮЁжүҖи§Ғ пјҢ жҲ‘们дёҚеҶҚжңүз©әзҷҪеӣҫиЎЁ гҖӮжҲ‘们жҜҸдёӘиҠӮзӮ№йғҪиў«жҸҸз»ҳдәҶ пјҢ иҝҷдәӣе°ұжҳҜжҲ‘们иҰҒжһ„е»әзҡ„дҪ“зі»з»“жһ„зҡ„"иҰҒзҙ " гҖӮдёӢдёҖжӯҘе°ҶжҳҜе°ҶжҲ‘们зҡ„жҹҗдәӣиҠӮзӮ№з»„з»ҮдёәйҖ»иҫ‘еҲҶз»„ пјҢ 然еҗҺе°ҶжҜҸдёӘиҠӮзӮ№дёҺиҫ№й“ҫжҺҘиө·жқҘ гҖӮ
 ж–Үз« жҸ’еӣҫ
> Build with the code from the gist linked here.
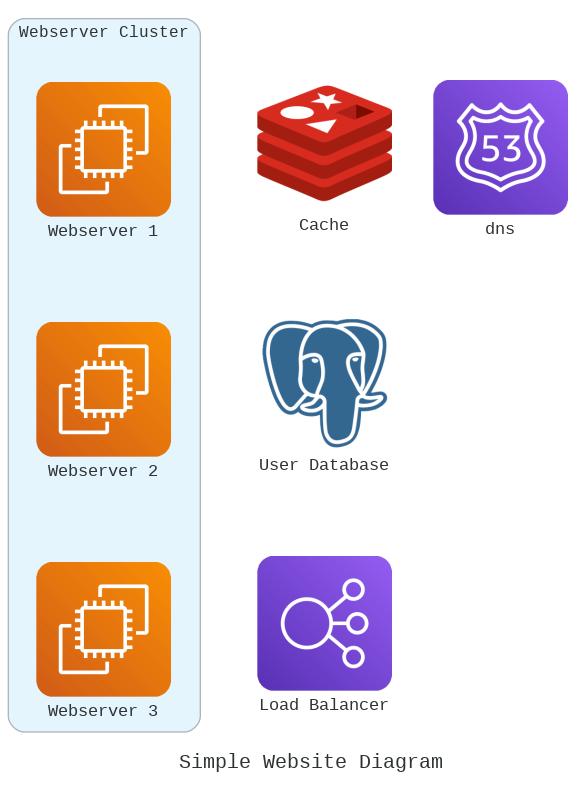
жӯҘйӘӨ3пјҡе°ҶиҠӮзӮ№еҲҶз»„пјҲеҸҜйҖүпјүеңЁжӯӨзӨәдҫӢдёӯ пјҢ жҲ‘们е°ҶеҜ№иҙҹиҪҪе№іиЎЎзҡ„WebжңҚеҠЎеҷЁиҝӣиЎҢеҲҶз»„ гҖӮеңЁиҝҮеҺ»еҲӣе»әзҡ„еӨ§йҮҸеӣҫиЎЁдёӯ пјҢ иҝҷ并йқһжҖ»жҳҜеҝ…иҰҒзҡ„ пјҢ дҪҶжҳҜйҡҸзқҖжӮЁзҡ„дҪ“зі»з»“жһ„зҡ„еҸ‘еұ• пјҢ е°ҶиҝҷдәӣиҠӮзӮ№еҲҶз»„еҲ°зҫӨйӣҶдёӯйҖҡеёёеҸҜд»ҘжҸҗй«ҳеҸҜиҜ»жҖ§ гҖӮ
еңЁдёӢйқўжӮЁеҸҜд»ҘзңӢеҲ° пјҢ иҰҒеҒҡеҲ°иҝҷдёҖзӮ№ пјҢ жҲ‘们еҸӘйңҖиҰҒе°ҶиҠӮзӮ№зҡ„е®һдҫӢ移еҠЁеҲ°жҲ‘们жӯЈеңЁеҲӣе»әзҡ„йӣҶзҫӨиҢғеӣҙеҶ…еҚіеҸҜ гҖӮ
from diagrams import Diagram, Clusterfrom diagrams.aws.compute import EC2from diagrams.aws.network import ELBfrom diagrams.aws.network import Route53from diagrams.onprem.database import PostgreSQL # Would typically use RDS from aws.databasefrom diagrams.onprem.inmemory import Redis # Would typically use ElastiCache from aws.databasewith Diagram("Simple Website Diagram") as diag:dns = Route53("dns")load_balancer = ELB("Load Balancer")database = PostgreSQL("User Database")cache = Redis("Cache")with Cluster("Webserver Cluster"):svc_group = [EC2("Webserver 1"),EC2("Webserver 2"),EC2("Webserver 3")]diagеҰӮжӮЁжүҖи§Ғ пјҢ иҜҘеӣҫд»Қ然еҸӘжҳҜиҠӮзӮ№еҲ—иЎЁ пјҢ дҪҶжҳҜзҺ°еңЁжҲ‘们е°ҶйҖӮеҪ“зҡ„иҠӮзӮ№иҒҡзұ»дёәйҖ»иҫ‘еҲҶз»„ гҖӮ
 ж–Үз« жҸ’еӣҫ
> Build with the code from the gist linked here.
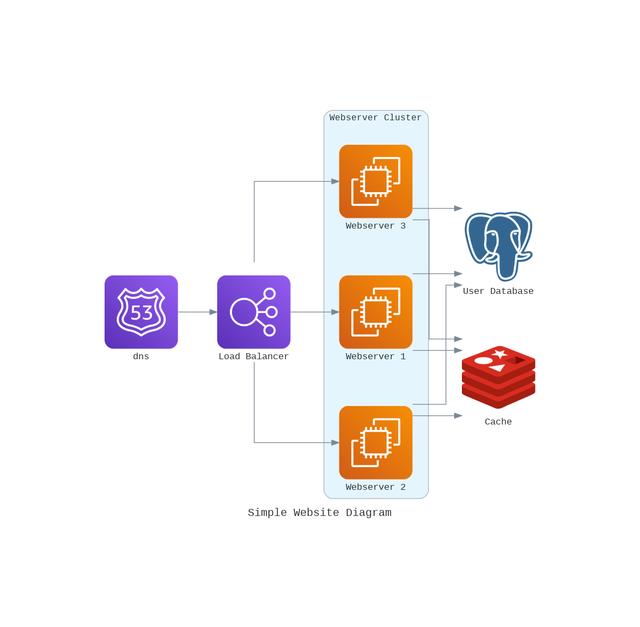
жӯҘйӘӨ4пјҡе°ҶжүҖжңүеҶ…е®№иҝһжҺҘеңЁдёҖиө·еңЁжңҖеҗҺдёҖжӯҘдёӯ пјҢ жҲ‘们е°ҶдёҚдјҡй“ҫжҺҘеҲҡеҲҡе®үжҺ’иҰҒеңЁжһ¶жһ„дёӯдҪҝз”Ёзҡ„иҠӮзӮ№ гҖӮеҪ“жҲ‘йңҖиҰҒжӣҙж–°жҲ–и°ғж•ҙжһ¶жһ„ж—¶ пјҢ жӯӨд»»еҠЎдҪҝжҲ‘иҠұиҙ№зҡ„ж—¶й—ҙжңҖй•ҝ гҖӮеҰӮжһңжӮЁеңЁдёӢйқўзңӢдёҖдёӢ пјҢ еҸӘйңҖз”ЁеҸҢз®ӯеӨҙе®ҡд№үжөҒеҲ°жҜҸдёӘиҠӮзӮ№зҡ„жөҒзЁӢе°ұеҸҜд»ҘдәҶпјҒ еңЁжӯӨзӨәдҫӢдёӯ пјҢ жҲ‘们е°Ҷд»…й“ҫжҺҘдёҚеёҰж Үзӯҫзҡ„иҠӮзӮ№ пјҢ дҪҶжҳҜеҰӮжһңжӮЁзңӢдёҖдёӢе°Ҷж Үзӯҫеә”з”ЁдәҺй“ҫжҺҘзҡ„ж–ҮжЎЈ пјҢ иҝҷжҳҜдёҖйЎ№йқһеёёз®ҖеҚ•зҡ„д»»еҠЎ гҖӮ
from diagrams import Diagram, Clusterfrom diagrams.aws.compute import EC2from diagrams.aws.network import ELBfrom diagrams.aws.network import Route53from diagrams.onprem.database import PostgreSQL # Would typically use RDS from aws.databasefrom diagrams.onprem.inmemory import Redis # Would typically use ElastiCache from aws.databasewith Diagram("Simple Website Diagram", direction='LR') as diag: # It's LR by default, but you have a few options with the orientationdns = Route53("dns")load_balancer = ELB("Load Balancer")database = PostgreSQL("User Database")cache = Redis("Cache")with Cluster("Webserver Cluster"):svc_group = [EC2("Webserver 1"),EC2("Webserver 2"),EC2("Webserver 3")]dns >> load_balancer >> svc_groupsvc_group >> cachesvc_group >> databasediagгҖҗз”ЁPythonеҲӣе»әжјӮдә®зҡ„жһ¶жһ„еӣҫгҖ‘з”ҹжҲҗзҡ„еӣҫеғҸеҸҜд»ҘеңЁдёӢйқўзңӢеҲ° пјҢ зҺ°еңЁжӮЁеҸҜд»ҘзңӢеҲ°еӣҫдёӯжҜҸдёӘиҠӮзӮ№д№Ӣй—ҙзҡ„йҖ»иҫ‘жөҒзЁӢ гҖӮеҸҜд»ҘйҖҡиҝҮжӣҙж”№е®ҡд№үиҠӮзӮ№зҡ„йЎәеәҸжқҘйҖҶиҪ¬жӯӨжөҒзЁӢ гҖӮйҷӨдәҶи°ғж•ҙжөҒзЁӢеӨ– пјҢ жӮЁиҝҳеҸҜд»Ҙжӣҙж”№и®ёеӨҡеҶ…е®№ пјҢ еӣ дёәиҫ№зјҳеҜ№иұЎеҢ…еҗ«дёүдёӘеұһжҖ§пјҡж Үзӯҫ пјҢ йўңиүІе’Ңж ·ејҸ гҖӮжҲ‘们дёҚдјҡеңЁиҝҷйҮҢд»Ӣз»ҚеҰӮдҪ•жҹҡжңЁ гҖӮеҰӮжһңжӮЁжңүе…ҙи¶ЈдәҶи§ЈжӣҙеӨҡдҝЎжҒҜ пјҢ иҜ·еҸӮи§Ғжң¬ж–Үз»“е°ҫеӨ„зҡ„ж–ҮжЎЈй“ҫжҺҘ пјҢ 并且иҝҷдәӣеұһжҖ§еҸҚжҳ дәҶеҜ№еә”зҡ„graphvizиҫ№зјҳеұһжҖ§ пјҢ еҰӮжһңжӮЁиҝҮеҺ»дҪҝз”ЁиҜҘе·Ҙе…·еҸҜд»Ҙз®ҖеҢ–дәӢжғ… гҖӮ
 ж–Үз« жҸ’еӣҫ
жҺЁиҚҗйҳ…иҜ»
- и®Ўз®—жңәдё“дёҡеӨ§дёҖдёӢеӯҰжңҹпјҢиҜҘйҖүжӢ©еӯҰд№ JavaиҝҳжҳҜPython
- жғіиҮӘеӯҰPythonжқҘејҖеҸ‘зҲ¬иҷ«пјҢйңҖиҰҒжҢүз…§е“ӘеҮ дёӘйҳ¶ж®өеҲ¶е®ҡеӯҰд№ и®ЎеҲ’
- жңӘжқҘжғіиҝӣе…ҘAIйўҶеҹҹпјҢиҜҘеӯҰд№ PythonиҝҳжҳҜJavaеӨ§ж•°жҚ®ејҖеҸ‘
- Lip FactoryеҲ©з”Ёдәәе·ҘжҷәиғҪзҺ°еңәдёәйЎҫе®ўеҲӣе»әе®ҡеҲ¶еҸЈзәў
- еҫ®иҪҜзӣҳзӮ№12жңҲOneDriveжӣҙж–°пјҡзҪ‘йЎөз«ҜеҸҜеҲӣе»әе…ұдә«еә“зӯү
- 2021е№ҙJavaе’ҢPythonзҡ„еә”з”Ёи¶ӢеҠҝдјҡжңүд»Җд№ҲеҸҳеҢ–пјҹ
- йқһи®Ўз®—жңәдё“дёҡзҡ„жң¬з§‘з”ҹпјҢжғіеҲ©з”ЁеҜ’еҒҮеӯҰд№ PythonпјҢиҜҘжҖҺд№Ҳе…ҘжүӢ
- з”ЁPythonеҲ¶дҪңеӣҫзүҮйӘҢиҜҒз ҒпјҢиҝҷдёүиЎҢд»Јз Ғе®ҢдәӢе„ҝ
- еҺҶж—¶ 1 дёӘжңҲпјҢеҒҡдәҶ 10 дёӘ Python еҸҜи§ҶеҢ–еҠЁеӣҫпјҢз”Ёеҝғдё”зІҫзҫҺ...
- дёәдҪ•еңЁдәәе·ҘжҷәиғҪз ”еҸ‘йўҶеҹҹPythonеә”з”ЁжҜ”иҫғеӨҡ


