赠书 | Python人脸五官姿态检测( 三 )
 文章插图
文章插图
模型的调用和显示(1)根据点坐标绘制标注图形:
def point_line(point,line):x1 = line[0]y1 = line[1]x2 = line[2]y2 = line[3]x3 = point[0]y3 = point[1]k1 = (y2 - y1)*1.0 /(x2 -x1)b1 = y1 *1.0 - x1 *k1 *1.0k2 = -1.0/k1b2 = y3 *1.0 -x3 * k2 *1.0x = (b2 - b1) * 1.0 /(k1 - k2)y = k1 * x *1.0 +b1 *1.0return [x,y]def point_point(point_1,point_2):x1 = point_1[0]y1 = point_1[1]x2 = point_2[0]y2 = point_2[1]distance = ((x1-x2)**2+(y1-y2)**2)**0.5return distancedef point_line(point,line):x1 = line[0]y1 = line[1]x2 = line[2]y2 = line[3]x3 = point[0]y3 = point[1]k1 = (y2 - y1)*1.0 /(x2 -x1)b1 = y1 *1.0 - x1 *k1 *1.0k2 = -1.0/k1b2 = y3 *1.0 -x3 * k2 *1.0x = (b2 - b1) * 1.0 /(k1 - k2)y = k1 * x *1.0 +b1 *1.0return [x,y](2)主函数定义:通过加载训练好的模型和定义好的特征参数 , 通过摄像头获取的视频流或是读取本地视频和图片进行输出姿态特点:
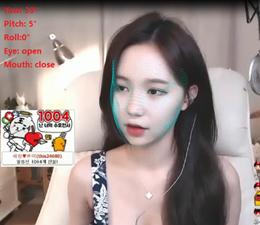
def main(args):checkpoint = torch.load(args.model_path, map_location=device)plfd_backbone = PFLDInference.to(device)plfd_backbone.load_state_dict(checkpoint['plfd_backbone'])plfd_backbone.evalplfd_backbone = plfd_backbone.to(device)transform = transforms.Compose([transforms.ToTensor()])videoCapture = cv2.VideoCapture(args.image_name)fps = videoCapture.get(cv2.CAP_PROP_FPS)size = (int(videoCapture.get(cv2.CAP_PROP_FRAME_WIDTH)),int(videoCapture.get(cv2.CAP_PROP_FRAME_HEIGHT)))print("fps:",fps,"size:",size)videoWriter = cv2.VideoWriter("./video/result.avi",cv2.VideoWriter_fourcc('X','V','I','D'),fps,size)success,img = videoCapture.readcv2.imwrite("1.jpg",img)while success:height, width = img.shape[:2]model_test = AntiSpoofPredict(args.device_id)image_bbox = model_test.get_bbox(img)x1 = image_bbox[0]y1 = image_bbox[1]x2 = image_bbox[0] + image_bbox[2]y2 = image_bbox[1] + image_bbox[3]w = x2 - x1h = y2 - y1size = int(max([w, h]))cx = x1 + w/2cy = y1 + h/2x1 = cx - size/2x2 = x1 + sizey1 = cy - size/2y2 = y1 + sizedx = max(0, -x1)dy = max(0, -y1)x1 = max(0, x1)y1 = max(0, y1)edx = max(0, x2 - width)edy = max(0, y2 - height)x2 = min(width, x2)y2 = min(height, y2)cropped = img[int(y1):int(y2), int(x1):int(x2)]if (dx > 0 or dy > 0 or edx > 0 or edy > 0):cropped = cv2.copyMakeBorder(cropped, dy, edy, dx, edx, cv2.BORDER_CONSTANT, 0)cropped = cv2.resize(cropped, (112, 112))input = cv2.resize(cropped, (112, 112))input = cv2.cvtColor(input, cv2.COLOR_BGR2RGB)input = transform(input).unsqueeze(0).to(device)_, landmarks = plfd_backbone(input)pre_landmark = landmarks[0]pre_landmark = pre_landmark.cpu.detach.numpy.reshape(-1, 2) * [112, 112]point_dict = {}i = 0for (x,y) in pre_landmark.astype(np.float32):point_dict[f'{i}'] = [x,y]i += 1效果如下图所示:
 文章插图
文章插图
源码地址:
#欢迎留言在评论区和我们讨论#
 文章插图
文章插图
看完本文 , 对于python实现人脸检测你有什么想说的?
欢迎在评论区留言
推荐阅读


![[vivo]两千左右可以搞定的5G中端机:一款120Hz高刷屏,另一款续航怪兽](http://img88.010lm.com/img.php?https://image.uc.cn/s/wemedia/s/2020/4c382528b7b9d7f7ebee19b4bbca1156.jpg)


- 计算机专业大一下学期,该选择学习Java还是Python
- 想自学Python来开发爬虫,需要按照哪几个阶段制定学习计划
- 未来想进入AI领域,该学习Python还是Java大数据开发
- 识别|不摘口罩也能识别人脸?伊朗推出新型智能摄像头加强治安
- 人脸识别设备主板如何选型 软硬整合大幅缩短开发时间
- 2021年Java和Python的应用趋势会有什么变化?
- 非计算机专业的本科生,想利用寒假学习Python,该怎么入手
- 用Python制作图片验证码,这三行代码完事儿
- 历时 1 个月,做了 10 个 Python 可视化动图,用心且精美...
- 为何在人工智能研发领域Python应用比较多