Linux йҖҡиҝҮ/dev/uinputжЁЎжӢҹжҢүй”®еҸ‘йҖҒKeyй”®еҖј
дёҖгҖҒuinputеңЁд»ҘдёӢжғ…еҶөдёӢеҸҜд»Ҙз»ҷжҲ‘们еёҰжқҘеҫҲеӨ§зҡ„ж–№дҫҝпјҡ
гҖҗLinux йҖҡиҝҮ/dev/uinputжЁЎжӢҹжҢүй”®еҸ‘йҖҒKeyй”®еҖјгҖ‘ 1гҖҒдёҚйңҖиҰҒиҮӘе·ұеҶҷй©ұеҠЁ
2гҖҒз”ЁжҲ·жҖҒеҗ‘/dev/input/eventXеҶҷе…ҘдәӢ件 пјҢ еҚіз”ЁжҲ·еҗ‘KernelжіЁе…Ҙж•°жҚ®
дәҢгҖҒдҪҝз”ЁUInputзҡ„жӯҘйӘӨдёәпјҡ1. жү“ејҖи®ҫеӨҮ гҖӮ
 ж–Үз« жҸ’еӣҫ
жү“ејҖinput device
и°ғз”ЁkernelдёӢпјҡstatic int uinput_open(struct inode *inode, struct file *file) еҸӮж•°inodeеҜ№еә”зҡ„жҳҜ дё»и®ҫеӨҮдёә10,еӯҗи®ҫеӨҮдёә223зҡ„node(еҚідёәз”ЁжҲ·жҖҒзҡ„dev) еҸӮж•°fileеҜ№еә”жү“ејҖзҡ„ж–Ү件 гҖӮ еҠЁдҪңпјҡ еҲӣе»әдәҶnewdev-- uinput_deviceз»“жһ„ гҖӮnewdev->state = UIST_NEW_DEVICE;file->private_data = http://kandian.youth.cn/index/newdev;
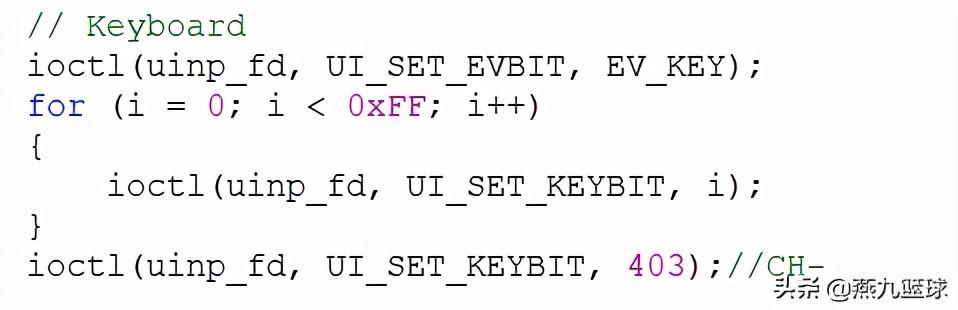
2. дҪҝз”Ёioctl() й…ҚзҪ®и®ҫеӨҮ гҖӮ
 ж–Үз« жҸ’еӣҫ
и°ғз”ЁkernelдёӢпјҡstatic long uinput_ioctl(struct file *file, unsigned int cmd, unsigned long arg) еҸӮж•°fileеҜ№еә”жү“ејҖзҡ„ж–Ү件 гҖӮеҸӮж•°cmd еҜ№еә”з”ЁжҲ·жҖҒioctlеҸӮж•°2 гҖӮ UI_SET_EVBIT еҸӮж•°argеҜ№еә”з”ЁжҲ·жҖҒioctlеҸӮж•°3 гҖӮ EV_KEYеҠЁдҪңпјҡ е°ҶdriverеҸӮж•°дј йҖ’иҝҮжқҘ гҖӮudev = file->private_data; udev->dev жҳҜдёӘinput_dev зұ»еһӢж•°жҚ® гҖӮжӯӨж—¶ пјҢ е®ғжңӘеҲқе§ӢеҢ– гҖӮеҰӮжһңudev->devдёәз©ә пјҢ еҲҷдҪҝз”Ё uinput_allocate_device(udev);з”іиҜ·input_devз»“жһ„ CMD=UI_SET_EVBIT uinput_set_bit(arg, evbit, EV_MAX); йҰ–е…ҲеҲӨж–ӯnewdev->stateдёәUIST_CREATED пјҢ еҲҷиҝ”еӣһй”ҷиҜҜз Ғ гҖӮиҝҷе°ұиҜҙжҳҺпјҡи®ҫзҪ®bit пјҢ йңҖиҰҒеңЁcreate input device д№ӢеүҚ гҖӮе…·дҪ“еҠЁдҪңдёәпјҡudev->dev->evbit и®ҫдёәEV_KEY.жіЁж„ҸпјҡжӯӨеӨ„input deviceзҡ„evbit: дёҖдёӘжҳҜevbitиЎЁзӨәи®ҫеӨҮжүҖж”ҜжҢҒзҡ„еҠЁдҪң.: #define EV_KEY 0x01 // жҢүй”® #define EV_REL 0x02 // йҮҠж”ҫ
е…¶е®ғи®ҫзҪ®еҰӮдёӢ: ret = ioctl(fd, UI_SET_RELBIT, REL_X); //йј ж Ү ret = ioctl(fd, UI_SET_RELBIT, REL_Y); ret = ioctl(fd, UI_SET_EVBIT, EV_ABS); ret = ioctl(fd, UI_SET_ABSBIT, ABS_X); ret = ioctl(fd, UI_SET_ABSBIT, ABS_Y); ret = ioctl(fd, UI_SET_ABSBIT, ABS_PRESSURE);
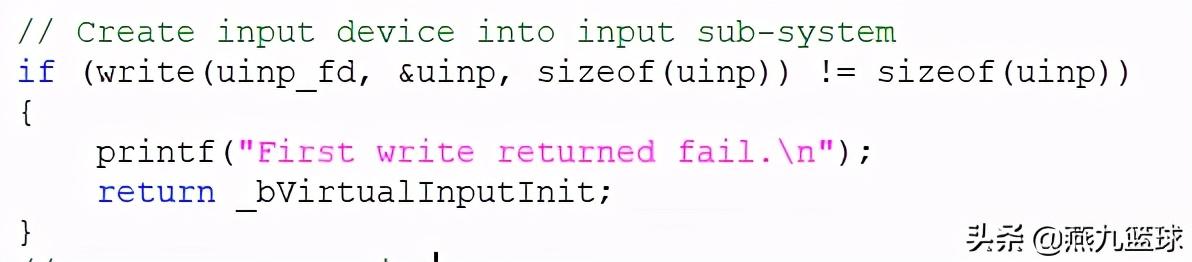
3. дҪҝз”Ёwrite() е°Ҷinput deviceдҝЎжҒҜи®ҫзҪ®еҘҪ гҖӮ
 ж–Үз« жҸ’еӣҫ
Device statusдёәUIST_NEW_DEVICE 并е°Ҷudev->dev иҝҷдёӘinput device е…·дҪ“еҢ– гҖӮ еҲқе§ӢеҢ–иҜҘinput_dev,д№ӢеҗҺ пјҢ ж”№еҸҳзҠ¶жҖҒпјҡ udev->state = UIST_SETUP_COMPLETE;
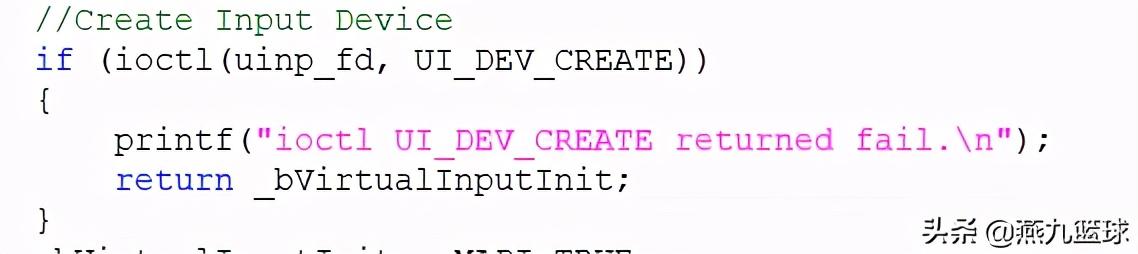
4. дҪҝз”Ёioctl(UI_DEV_CREATE)еҲӣе»әInput Device гҖӮ пјҲеҚідҪҝз”Ёwriteи®ҫзҪ®зҡ„пјү
 ж–Үз« жҸ’еӣҫ
и°ғз”ЁkernelдёӢпјҡinput_register_device(udev->dev); //еҗ‘еӯҗзі»з»ҹжіЁеҶҢиҜҘи®ҫеӨҮ пјҢ д№ӢеҗҺдёӯж–ӯж—¶input_eventпјҲпјүеҗ‘еӯҗзі»з»ҹжҠҘе‘ҠдәӢ件 udev->state = UIST_CREATED;
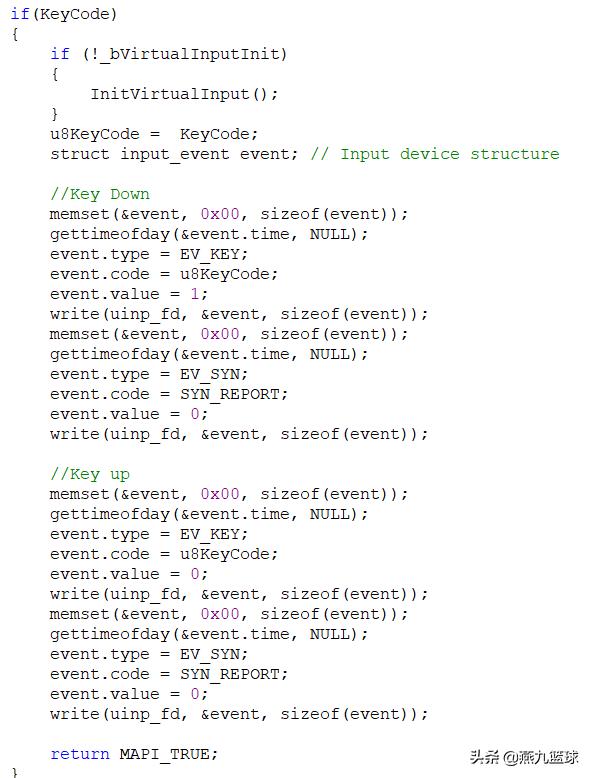
5. еҶҚдҪҝз”Ёwrite() еҶҷе…Ҙevent.
 ж–Үз« жҸ’еӣҫ
и°ғз”ЁkernelдёӢпјҡstatic ssize_t uinput_write(struct file *file, const char __user *buffer, size_t count, loff_t *ppos) еӣ дёәжӯӨж—¶stateдёәUIST_CREATED input_event(udev->dev, ev.type, ev.code, ev.value); // еҸ‘йҖҒevent.
жҺЁиҚҗйҳ…иҜ»


- ж–°дё“еҲ©жҳҫзӨәиӢ№жһңеңЁжңӘжқҘеҸҜиғҪи®©Apple WatchйҖҡиҝҮдј ж„ҹеҷЁжөӢйҮҸиЎҖеҺӢ
- iPhoneжҠҳеҸ еұҸиҰҒжқҘпјҹдёӨз§Қи®ҫи®ЎйҖҡиҝҮеҲқжӯҘжөӢиҜ•
- LGеұ•зӨәе…ЁзҗғйҰ–ж¬ҫйҖҡиҝҮEyesafeи®ӨиҜҒзҡ„з”өи§ҶжҳҫзӨәеұҸ
- жҸҗжЎҲйҖҡиҝҮпјҡFedora 34й»ҳи®ӨеҗҜз”Ёsystemd-oomd
- Linux Kernel 5.10.5еҸ‘еёғпјҡзҰҒз”ЁFBCONеҠ йҖҹж»ҡеҠЁзү№жҖ§
- еӨ–еӘ’пјҡиӢ№жһңдёӨж¬ҫеҸҜжҠҳеҸ iPhoneж ·е“ҒйҖҡиҝҮеҜҢеЈ«еә·з¬¬дёҖйЎ№иҙЁйҮҸжЈҖжөӢ
- дёүжҳҹGalaxy A52 5GйҖҡиҝҮ3Cи®ӨиҜҒ ж”ҜжҢҒжңҖй«ҳ15Wеҝ«йҖҹе……з”ө
- 继вҖңе°Ҹе·ЁиӣӢвҖқPhantomеҗҺпјҢDevialetеёқз“Ұйӣ·йҰ–ж¬ҫзңҹж— зәҝйҷҚеҷӘиҖіжңәдјҡжҲҗдёәдёӢдёҖдёӘзҲҶж¬ҫеҗ—пјҹ
- и°·жӯҢеҸҜиғҪдјҡйҖҡиҝҮдёҚжӣҙж–°iOSеә”з”ЁжқҘ规йҒҝиӢ№жһңзҡ„йҡҗз§ҒжҠ«йңІ
- Linux 5.11ејҖе§Ӣеӣҙз»•PCI Express 6.0иҝӣиЎҢж—©жңҹеҮҶеӨҮ