Pythonз»ҳеҲ¶ж ҮеҮҶдә”жҳҹзәўж——иҮҙ敬дјҹеӨ§зҡ„зҘ–еӣҪ
д»Ҡе№ҙжҳҜе»әеӣҪ71е‘Ёе№ҙ пјҢ е…ҲзҘқзҰҸзҘ–еӣҪз№ҒиҚЈеҜҢејә пјҢ ж„ҝеӨ©дҪ‘жҲ‘дёӯеҚҺж°ёиҝңжҳҢзӣӣ гҖӮ еӣҪеәҶеҒҮжңҹе°ҶиҰҒиҝҮеҺ»дёҖеҚҠ пјҢ дёҚзҹҘйҒ“еӨ§е®¶еҮәиЎҢж—…йҖ”жҳҜеҗҰйЎәеҲ© гҖӮ д»ҠеӨ©е°ұе’ҢеӨ§е®¶дёҖиө·еӯҰд№ дҪҝз”ЁTurtleз»ҳеҲ¶дёҖйқўж ҮеҮҶзҡ„еӣҪж—— пјҢ д»ҘиҮҙ敬жҲ‘们дјҹеӨ§зҡ„зҘ–еӣҪ гҖӮ иҜқдёҚеӨҡиҜҙ пјҢ е…ҲзңӢеҠЁз”»пјҒ
 ж–Үз« жҸ’еӣҫ
дә”жҳҹзәўж——
turtleдёӯж–ҮеҗҚеҸ«жө·йҫҹ пјҢ иө·еҲқе®ғжҳҜз”ЁжқҘж•ҷе°ҸжңӢеҸӢеӯҰд№ зј–зЁӢзҡ„зҡ„дёҖдёӘеә“ пјҢ йҡҫжҖӘдјҡеҸ–дёҖдёӘиҝҷд№ҲеҸҜзҲұзҡ„еҗҚеӯ— гҖӮ дёҚиҝҮ пјҢ е®ғзҡ„з»ҳеӣҫеҠҹиғҪеҚҒеҲҶзҡ„ејәеӨ§ пјҢ еҸҜд»ҘеҲ¶дҪңеҮәеҫҲеӨҡеӨҚжқӮзҡ„з»ҳеӣҫ гҖӮ е®ғжҳҜpythonзҡ„ж ҮеҮҶеә“ пјҢ еҸҜд»ҘзӣҙжҺҘдҪҝз”Ё гҖӮ
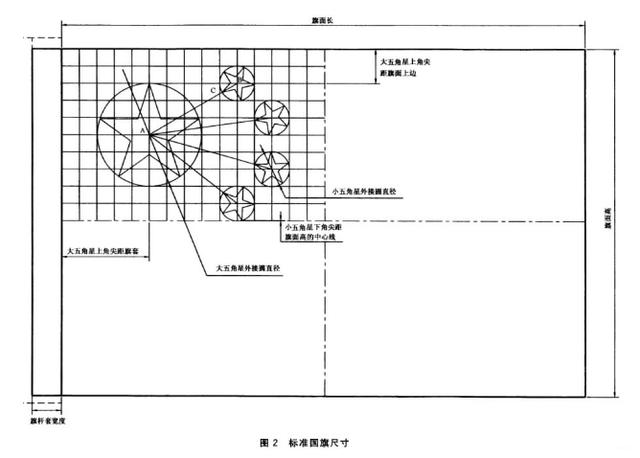
ж ҮеҮҶзҡ„еӣҪж——иҜҘжҖҺд№Ҳз»ҳеҲ¶пјҹеӣҪж——зҡ„з»ҳеҲ¶жҳҜжңүжҳҺзЎ®зҡ„规е®ҡзҡ„ пјҢ еңЁгҖҠдёӯеҚҺдәәж°‘е…ұе’ҢеӣҪеӣҪ家ж ҮеҮҶеӣҪж——пјҲGB 12982-2004пјүгҖӢ пјҢ дёӯжҳҺ确规е®ҡдәҶеӣҪж——зҡ„жҜ”дҫӢгҖҒйўңиүІгҖҒжҜҸйў—жҳҹзҡ„еҪўзҠ¶е’Ңе…·дҪ“дҪҚзҪ®зӯүдҝЎжҒҜ гҖӮ жҲ‘们еҸҜд»ҘеҸӮиҖғиҝҷдёӘж ҮеҮҶиҝӣиЎҢз»ҳеҲ¶ гҖӮ
 ж–Үз« жҸ’еӣҫ
дә”жҳҹзәўж——и®ҫи®Ўеӣҫ
зңӢдәҶдёҠйқўзҡ„и®ҫи®Ўеӣҫ пјҢ еӨ§е®¶жҳҜдёҚжҳҜеҫҲжё…жҷ°дәҶпјҹжҲ‘们еҸҜд»ҘзңӢзңӢдёӢйқўзҡ„еҠЁеӣҫ пјҢ дјҡжӣҙеҠ жё…жҘҡж•ҙдёӘз»ҳеҲ¶жөҒзЁӢ гҖӮ
 ж–Үз« жҸ’еӣҫ
дә”жҳҹзәўж——з»ҳеҲ¶жөҒзЁӢпјҲе…¬дј—еҸ·еӣҫзүҮжңүеӨұзңҹ пјҢ зӮ№еҮ»вҖңйҳ…иҜ»еҺҹж–ҮвҖқжҹҘзңӢжё…жҷ°еӣҫзүҮпјү
д»Һи®ҫи®ЎеӣҫдёҠзңӢ пјҢ еӣҪж——зҡ„й•ҝе®ҪжҜ”жҳҜ3пјҡ2 гҖӮ жҲ‘们е°ұжҠҠеӣҪж——зҡ„й•ҝе®ҡдёә900еғҸзҙ е’Ң600еғҸзҙ пјҢ дёәдәҶжҳҫзӨәж•Ҳжһңе°ұеҸҜд»ҘжҠҠжҳҫзӨәзӘ—еҸЈзЁҚеҫ®е®ҡеӨ§дёҖдәӣ1000пјҡ700 гҖӮ зЎ®е®ҡдәҶеӣҪж——зҡ„еӨ§е°Ҹ пјҢ жҲ‘们е°ұеҸҜд»ҘиҝӣиЎҢз»ҳеҲ¶дәҶ гҖӮ еңЁз»ҳеҲ¶зҡ„иҝҮзЁӢдёӯз”ЁеҲ°еҮ дёӘturtleеә“зӣёе…ізҡ„еҮҪж•° пјҢ жҲ‘们е…ҲзҶҹжӮүдёҖдёӢ гҖӮ
еҮҪж•°жҸҸиҝ°speed(speed)и®ҫзҪ®з”»з¬”移еҠЁйҖҹеәҰ,画笔з»ҳеҲ¶зҡ„йҖҹеәҰиҢғеӣҙ[0,10]ж•ҙж•°, ж•°еӯ—и¶ҠеӨ§и¶Ҡеҝ«pencolor(color)и®ҫзҪ®з”»з¬”йўңиүІfillcolor(color)и®ҫзҪ®еЎ«е……йўңиүІcolor(color)жҲ–color(color1, color2)еҗҢж—¶и®ҫзҪ®з”»з¬”йўңиүІе’ҢеЎ«е……йўңиүІbegin_fill()еҮҶеӨҮејҖе§ӢеЎ«е……еӣҫеҪўend_fill()е®ҢжҲҗеЎ«е……еӣҫеҪўgoto(x, y)移еҠЁз”»з¬”еҲ°пјҲx, yпјүдҪҚзҪ®right(degree)йЎәж—¶й’Ҳ移еҠЁdegreeеәҰleft(degree)йҖҶж—¶й’Ҳ移еҠЁdegreeеәҰpenup()жҸҗиө·з¬”移еҠЁ пјҢ дёҚз»ҳеҲ¶еӣҫеҪўpendwon()ж”ҫдёӢ画笔 пјҢ 移еҠЁж—¶е°Ҷз»ҳеҲ¶еӣҫеҪўforward(distance)еҗ‘еҪ“еүҚ画笔方еҗ‘移еҠЁdistanceеғҸзҙ й•ҝеәҰcircle( r)з”»еңҶ пјҢ еҚҠеҫ„дёәr жӯЈ(иҙҹ) пјҢ иЎЁзӨәеңҶеҝғеңЁз”»з¬”зҡ„е·Ұиҫ№(еҸіиҫ№)з”»еңҶsetheading(angle)и®ҫзҪ®з»қеҜ№ж—ӢиҪ¬и§’еәҰhideturtle()йҡҗи—Ҹ画笔done()еҒңжӯўз»ҳз”»зӘ—еҸЈдёҚе…ій—ӯ
д»ҘдёҠиЎЁж јйҮҢе°ұжҳҜжҲ‘们е°ҶиҰҒз”ЁеҲ°зҡ„еӣҫеҪўз»ҳеҲ¶зҡ„дёҖдәӣеҮҪж•° пјҢ зҶҹжӮүдәҶиҝҷдәӣж“ҚдҪңд№ӢеҗҺ пјҢ жҲ‘们дёҖиө·з»ҳеҲ¶еҗ§ пјҢ дёӢйқўзҡ„д»Јз ҒеҸҜдҫӣеӨ§е®¶еҸӮиҖғ гҖӮ
е…¶дёӯ пјҢ auxiliaryLine еҸҳйҮҸеҸҜд»Ҙз”ЁжқҘжҺ§еҲ¶иҫ…еҠ©зәҝзҡ„з»ҳеҲ¶дёҺеҗҰ пјҢ еҰӮжһңи®ҫдёәFalse пјҢ еҲҷе°ҶдёҚдјҡз»ҳеҲ¶иҫ…еҠ©зәҝ гҖӮ
#!/usr/bin/env python3# -*-coding:utf-8-*-import turtle as tlimport math as m#з”»жҳҹжҳҹйңҖиҰҒе…ҲжҢҮеҗ‘еңҶеҝғж–№еҗ‘, dеңҶзӣҙеҫ„def drawStar(d):tl.pendown()tl.color('yellow')tl.begin_fill()tl.left(18)for i in range(5):tl.forward(d * 69 / 192)#дә”и§’и§’жҳҹй•ҝеәҰдёҺзӣҙеҫ„жҜ”69/192tl.left(72)tl.forward(d * 69 / 192)tl.right(144)tl.end_fill()tl.penup()def drawCircle(x, y, r):tl.penup()tl.setheading(0)tl.goto(x, y - r)tl.pendown()tl.circle(r)tl.penup()def drawLine(x1 ,y1, x2, y2):tl.penup()tl.goto(x1, y1)tl.down()tl.goto(x2, y2)tl.penup()length = 900width = 600step = length / 30auxiliaryLine = True#иҫ…еҠ©зәҝжҺ§еҲ¶#и®ҫзҪ®зӘ—еҸЈеӨ§е°Ҹtl.setup(length + 100, width + 100)tl.speed(10)tl.penup()tl.goto(length/2 + 30, -width/2 - 30)tl.color("black")tl.write("ж¬ўиҝҺе…іжіЁе…¬дј—еҸ·гҖҗWillзҡ„еӨ§йЈҹе ӮгҖ‘", align="right", font=("жҘ·дҪ“", 12, "bold"))#移еҠЁе°Ҹд№ҢйҫҹеҲ°ж——йқўе·ҰдёҠи§’ з”»зәўж——зҡ„зҹ©еҪўtl.goto(-1 * length/2, width/2)tl.setheading(0)tl.pendown()tl.pencolor("red")tl.fillcolor("red")tl.begin_fill()tl.forward(length)tl.right(90) #ж–№еҗ‘ дёӢtl.forward(width)tl.right(90) #ж–№еҗ‘ е·Ұtl.forward(length)tl.right(90) #ж–№еҗ‘ дёҠtl.forward(width)tl.right(90) #ж–№еҗ‘ еҸіtl.end_fill()tl.penup()if(auxiliaryLine):tl.pencolor("white")tl.setheading(0)for i in range(1, 11):tl.goto(-15*step, 10*step - i*step)tl.pendown()tl.forward(15*step)tl.penup()tl.setheading(-90)for i in range(1,16):tl.goto(-15*step + i*step, 10*step)tl.pendown()tl.forward(10*step)tl.penup()#дё»жҳҹ: еңҶеҝғпјҲ-10 пјҢ5пјү, еҚҠеҫ„=3if (auxiliaryLine):tl.pencolor("white")drawCircle(-10*step, 5*step, 3*step)tl.goto(-10*step, 8*step)tl.setheading(-90)drawStar(6*step)#е°Ҹжҳҹ1: еңҶеҝғпјҲ-5 пјҢ8пјү, еҚҠеҫ„=1if (auxiliaryLine):tl.pencolor("white")drawLine(-10*step, 5*step, -5*step, 8*step)drawCircle(-5*step, 8*step, step)tl.goto(-5*step, 8*step)tl.setheading(-90)angle1 = m.degrees(m.acos(3 / m.sqrt((3 ** 2) + (5 ** 2))))tl.right(angle1)tl.forward(step)tl.right(180)drawStar(2*step)#е°Ҹжҳҹ2: еңҶеҝғпјҲ-3, 6пјү еҚҠеҫ„=1if (auxiliaryLine):tl.pencolor("white")drawLine(-10*step, 5*step, -3*step, 6*step)drawCircle(-3*step, 6*step, step)tl.goto(-3*step, 6*step) #еңҶеҝғtl.setheading(-90)angle2 = m.degrees(m.acos(1 / m.sqrt(1**2 + 7 **2)))tl.right(angle2)tl.forward(step)tl.right(180)drawStar(2*step)#е°Ҹжҳҹ3: еңҶеҝғпјҲ-3 пјҢ 3пјү еҚҠеҫ„=1if(auxiliaryLine):tl.pencolor("white")drawLine(-10*step, 5*step, -3*step, 3*step)drawCircle(-3*step, 3*step, step)tl.goto(-3*step, 3*step)tl.setheading(90)angle3 = m.degrees(m.acos(2 / m.sqrt(2**2 + 7**2)))tl.left(angle3)tl.forward(step)tl.left(180)drawStar(2*step)#е°Ҹжҳҹ4пјҡеңҶеҝғпјҲ-5 пјҢ 1пјү еҚҠеҫ„=1if (auxiliaryLine):tl.pencolor("white")drawLine(-10*step, 5*step, -5*step, 1*step)drawCircle(-5*step, 1*step, step)tl.goto(-5*step, 1*step)tl.setheading(90)angle4 = m.degrees(m.acos(4 / m.sqrt(4**2 + 5**2)))tl.left(angle4)tl.forward(step)tl.left(180)drawStar(2*step)tl.hideturtle()tl.done()
жҺЁиҚҗйҳ…иҜ»


- и®Ўз®—жңәдё“дёҡеӨ§дёҖдёӢеӯҰжңҹпјҢиҜҘйҖүжӢ©еӯҰд№ JavaиҝҳжҳҜPython
- жғіиҮӘеӯҰPythonжқҘејҖеҸ‘зҲ¬иҷ«пјҢйңҖиҰҒжҢүз…§е“ӘеҮ дёӘйҳ¶ж®өеҲ¶е®ҡеӯҰд№ и®ЎеҲ’
- жңӘжқҘжғіиҝӣе…ҘAIйўҶеҹҹпјҢиҜҘеӯҰд№ PythonиҝҳжҳҜJavaеӨ§ж•°жҚ®ејҖеҸ‘
- йҳҝйҮҢиў«жҢҮжҸ’жүӢдә‘еҚ—е’–е•Ўж ҮеҮҶеҲ¶е®ҡпјҹеӨҡеҗҚзҹҘжғ…дәәжҠ«йңІиҜҰжғ…
- е°Ҹзұі11ж— е……з”өеҷЁж ҮеҮҶзүҲи¶…2дёҮеҗҚзұізІүдёӢеҚ•
- 2021е№ҙJavaе’ҢPythonзҡ„еә”з”Ёи¶ӢеҠҝдјҡжңүд»Җд№ҲеҸҳеҢ–пјҹ
- йқ’е°‘е№ҙ|е°ҒйқўиҜ„и®ә |вҖңйқ’е°‘е№ҙжЁЎејҸвҖқдҫқж—§жјҸжҙһзҷҫеҮәпјҢж ҮеҮҶеҢ–еҗҲ规жЎҶжһ¶еҝ…йЎ»иҗҪең°
- йқһи®Ўз®—жңәдё“дёҡзҡ„жң¬з§‘з”ҹпјҢжғіеҲ©з”ЁеҜ’еҒҮеӯҰд№ PythonпјҢиҜҘжҖҺд№Ҳе…ҘжүӢ
- з”ЁPythonеҲ¶дҪңеӣҫзүҮйӘҢиҜҒз ҒпјҢиҝҷдёүиЎҢд»Јз Ғе®ҢдәӢе„ҝ
- еҺҶж—¶ 1 дёӘжңҲпјҢеҒҡдәҶ 10 дёӘ Python еҸҜи§ҶеҢ–еҠЁеӣҫпјҢз”Ёеҝғдё”зІҫзҫҺ...